Here is a Simple Tip to Set a Button for Changing the Blog View to Dynamic Views.I added Smooth jquery Hover Effect to Button.You can set any template to your Blogger Blog.If you add this Button to your Blog.It lets your Blog visitors to View Blog in Dynamic Views when they Click this Button.
Step 1.Add jQuery Plugin
Step 1.Add jQuery Plugin
- Go to Design->Edit HTML
- Copy and Paste Below code inside <head> section
<script src="https://ajax.googleapis.com/ajax/libs/jquery/1.7.1/jquery.min.js"></script>
- Go to Design-> Page Elements
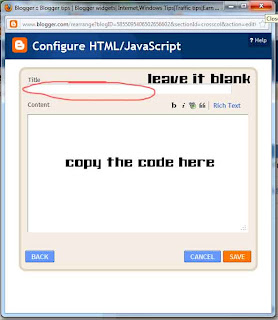
- Click on Add Gadget ,Select HTML/Javascript from it

<div class="noopdynamic">
Click this for change the view to Dynamic views</div>
<a href="/view">
<img class="noopdynamicimg" src="https://blogger.googleusercontent.com/img/b/R29vZ2xl/AVvXsEgPpMOnkmjV3S0-eAlRmjs1ZrqpRWW0Ide94lyrhDYVlQ8QCypLVgvWjlNEAnEN_wBQA5a3zdwKxVuYz1LffunR9v_SoJ0CahhsAuX5XDJW35XNX-DihascXnXYdb23wxNBUff4lRRSUNY/s1600/google+dynamic+views.jpg" /></a>
<style type="text/css">
.noopdynamicimg{bottom: 2%;
position: fixed;
right: 1%;}
.noopdynamic {background: -moz-linear-gradient(top, #aebcbf 0%, #6e7774 50%, #0a0e0a 51%, #0a0809 100%); background: -webkit-linear-gradient(top, #aebcbf 0%, #6e7774 50%, #0a0e0a 51%, #0a0809 100%);
background-color:#ABABAB;
border: 2px solid;
border-radius: 6px 6px 6px 6px;
bottom: 13%;
padding: 4px;z-index:999;
position: fixed;
right: 5%;
font:18px Arial;
text-shadow: 1px 1px 0 #FFFFFF;
width: 21%;
box-shadow:0 0 5px;
}
</style>
<script type="text/javascript">
$(function(){
$(".noopdynamic").hide(0);
$(".noopdynamicimg").hover(function(){
$(".noopdynamic").show("slow");
},function(){$(".noopdynamic").hide("medium");
});});
</script>
- Then Save it.
- That's all,you are done..


0 comments:
Post a Comment
Confused? Feel free to ask
Your feedback is always appreciated. We will try to reply to your queries as soon as time allows.
Note:
1. You Can add HTML CODE in comments.
2. You can always Test the tutorial.
3. No cheesy/spam Comments tolerated Spam comments will be deleted immediately upon our review.
Regards,
Saeed Aquib Ahmed :)